Showing posts with label Twisted Easel. Show all posts

Saturday, January 29, 2022

Yeehaw!

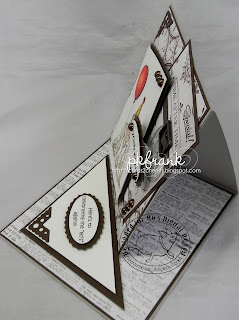
 Hello again!! I have another fun card to share with you!! This one is a birthday card for a friend who is turning 80 years YOUNG!!! 

This 5.5" square twisted easel card features Mo Manning's "Yeehaw!" This wonderfully silly digi image is available HERE in Mo's online store. 
Here are a couple of views as it opens up . . . 


My Card "Recipe" . . .
Image printed onto Cryogen cardstock
Early Espresso Cardstock: Stampin' Up
Corner die and jewels: My stash
DPs: "Black & White Timeless" by Kaiser Craft
Glossy Accents (on balloon)
Stickles Glitter Glue (on hat)
Inside sentiment: Computer generated
Oval and scalloped oval punch 
Copic Sketch Markers & Colored Pencils

And finally . . . 
Be sure to check out ALL of Mo's sites . . .
* Dream Team Blog HERE for daily inspiration
* Mo's Digital Pencil Stamps Facebook page HERE for contests, sneak peeks, & sharing
*Mo's Patreon Page HERE


Thanks for stopping by! See you soon!


Thursday, August 13, 2020

Mermaid Kisses

Hello friends! Welcome back! I have a sweet easel card to share with you today!!
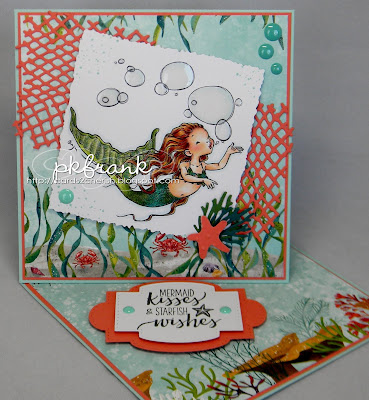
This 5.5" square/twisted easel card features Mo Manning's "Mermaid Kisses." You can find this adorable mermaid digi HERE in Mo's online store.

Here's what it looks like opened up . . .
My Card "Recipe" . . .
Image printed onto Copic X-Press It cardstock
Cardstock, DPs, Dies, and Sentiment stamps: Stampin' Up
Baubles: My stash
Glossy Accents & Wink of Stella
Copic Sketch Markers & Colored Pencils

And one more view . . .
Be sure to check out ALL of Mo's sites . . .
* Dream Team Blog HERE for daily inspiration
* Mo's Facebook Clubhouse HERE for contests, sneak peeks, & sharing
*Mo's Patreon Page HERE

* And don't forget to join us over at Mo's DP2 Challenge Blog HERE for monthly challenges plus a chance to be one of Mo's Guest Designers for a month! 

Thanks for stopping by . . . and, as always, for your kind comments! See you soon!

Tuesday, March 26, 2019

Sprout

Hello again from Arizona!! My sweet hubby and I are wrapping up our visit here . . . and getting ready to head back home to South Carolina! I have a couple more cards (made in my AZ studio) to share with you!! I'm happy to say that I've done a bit of shopping . . . for DPs, dies, and embellies! Yay!!! But I will be thrilled to get back to my "well stocked" SC studio . . . and my camera! I love my iphone . . . but it's not the best "camera"! LOL!

Here's today's creation . . . a "thank you" card for our neighbors in SC who have been watching over our home in SC and bringing in our mail this past month!! They're the best neighbors ever!!

This card features an adorable Mo Manning image called "Sprout" . . . she's available HERE in Mo's online store! This cutie has always been one of my favorite Mo Manning images . . . and so easy to color!! Here's a close-up . . .

The "twisted easel" opened up . . .

A peek from the other side . . .
My Card "Recipe" . . .
Cardstock: My Paper Studio
DPs, flower, & sentiment stamps: My stash
Dies: Cheery Lynn & Spellbinders
Copics & Caran D'Ache Pablo Colored Pencils

And, one last view . . .
Be sure to check out Mo's sites . . .
* Dream Team Blog HERE for daily inspiration
* Mo's Facebook Clubhouse HERE for contests, sneak peeks, & sharing

* And be sure to mark your calendars for April 6, 2019 . . . 
Our first blog challenge in almost 18 months will be happening . . . 
over at Mo's DP2 Challenge Blog HERE !!!

Thanks so much for stopping by . . . and for your lovely comments that make my day!!! See you soon!! Hugs,

Monday, June 22, 2015

My Sister . . . My Friend . . .

Hello, hello, helloooooo! I'm back with another gorgeous card . . . (well, I think it's gorgeous!!) . . . and I hope my sister thinks so too!

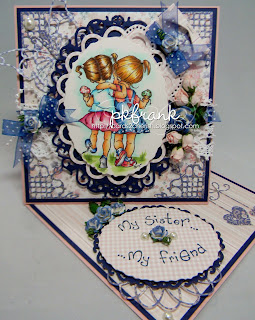
I used one of Mo's new digi images called "Summer Sisters" (available HERE in Mo's online store)! Mo has also created this image with curly haired girls . . . and another with one curly and one straight haired girl! Something for everyone!! Here's a close-up of these cuties . . .

I decided to make a twisted easel card . . . so my sister can display it in her office!! Here's what it looks like opened up . . .

And a bit of a side view . . .
My Card "Recipe" . . .
Image printed on Cryogen Metallic White cardstock
Night of Navy & Blushing Bride cardstock: Stampin' Up
Digi DPs: "Dress Shoppe" by Fat Quarter for Nitwits
Heart  tag die: Magnolia
Hearts on a Sting and Butterfly dies: Memory Box
Corner die, ribbon, & pearls: My stash
Floral Ovals, Lacy Ovals, & Deckled Ovals dies: Spellbinders
Sentiment: S.W.A.L.K.
Flowers: Wild Orchid Crafts
Copics & Colored Pencils

And here's a slightly angled view . . . 

I hope you'll stop by "Mo's Dream Team Blog" and "Mo's Clubhouse Blog" for lots of beautiful daily inspiration! Oh, and please check out the "Anything Goes w/optional theme: Babies" challenge going on all this month over at Mo's DP2 Challenge Blog!

Thanks for stopping by . . . and for your kind comments!
xo

Monday, May 19, 2014

Tutorial: Twisted Easel Card

Hello everyone!! I thought I'd post a little tutorial on how I make "Twisted Easel" cards. They're super easy . . . and fun . . . and so much fun to give and receive!! Be forewarned . . . there are LOTS of pics!! OK . . . So . . . here we go . . .
  1. Gather supplies. For this card, I'm using Mo Manning's "Ruby" available HERE in Mo's online store.
  2. I always make my cards 5.5 x 5.5 inches square. (If you prefer 6 x 6" cards, just adjust accordingly.) You'll need two pieces of card stock. One that is 5.5 x 11 inches. The other that is 5.5 x 5.5 inches. Take the larger of your two pieces and score it at 5.5 inches. Fold this in half. 
  3. Now comes the tricky part. Open up your folded card stock. Decide which way you want your card front to face . . . and score one side of your card from corner to corner (on the diagonal) . . . 
  4. Fold on the diagonal. (Are ya with me so far? Great!!) . . .
  5. You've just created your Twisted Easel Card "base"! See? Cool, huh?! Now I set that aside. Don't worry, we'll come back to it momentarily . . . 
  6. Next . . . I begin decorating the front of my card. So, take the 5.5 x 5.5 inch square piece of card stock and decorate just like you would any other card front! (NOTE: I always use Score Tape/Sookwang Tape when assembling my cards.)
  7. Here's the front of my card . . . semi-decorated! (I'll add more shortly. You'll see!) . . . 
  8. Now you'll want to attach the front of your card. This is the crucial step!! . . . 
  9. Once again, check to be sure you know which way you want your card front to face. Then position your partially decorated card front to the appropriate corner of your base. Double check before securing to base!! . . . 
  10. It should look like this when you've completed this step! . . . 

  11.  Next I decorate the card base . . . often times I'll even decorate the inside and back surfaces (this mostly depends on whether or not I can find matching/coordinating papers!) . . . 
  12. Here's how it looks from the front . . . 
  13. Next . . . I attach the sentiment on the base using foam dimensionals. They raise the sentiment up a bit so it can act as a "door stop" for the folded top of the card! Soooooo clever, eh?!
  14. Okey dokey!! Time to add my colored image and embellish! This is my favorite part!!
  15. Here's what this cutie looks like from the other side . . .
  16. And, last but not least, an "artsy" angle . . .
And there you have it! A darling little "Twisted Easel" card!! I hope you enjoyed this little tutorial . . . and I hope you'll try making one of these (if you haven't already!) Thanks so much for stopping by! See you soon! Hugs . . . .

Saturday, May 10, 2014

Happy Mother's Day!!

Happy Saturday! I hope you're having a fabulous weekend so far! I've been in my studio rearranging and organizing. I've found it works really well to just move the clutter into the hallway! Out of sight, out of mind! LOL!! Soooooo . . . since tomorrow (May 11th) is Mother's Day here in America, I wanted to send good wishes and warm hugs to all the mothers out there!! And . . . I thought I'd post a card I made for my sister to give to her MIL!
This sweet "gardener" was created by my friend, the very talented and super cool artist, Mo Manning! The image is called "Sadie" and is available here in Mo's online store. Here's a close-up . . .
So, here's the deal . . . since my last Mo card was verrrrrry "Clean and Simple" . . . I thought I'd make this one "Fussy and Complex"! hehe!! It's one of my faves . . . a "twisted easel" card. Here's a full view . . .
And a bit of a side-ish view . . .
My Card "recipe"
Image printed on Cryogen metallic white cardstock
Wisteria Wonder & Very Vanilla cardstock: Stampin' Up
DPs: Graphic 45 "Secret Garden"
Labels 18 Nestabilities by Spellbinders
Fence & grass dies: Magnolia
Corner die: Joy Crafts
Sentiment stamp: Hero Arts
Flowers: Wild Orchid Crafts
Charm, pearls, & ribbon: My stash
Butterfly punch: Martha Stewart

Markers used to color this Mo image:
Skin: Shin Han - YR133 & 132; Copics - E000, 0000, & E13 for darkest shadows
Cheeks: Shin Han - R139
Hair: Copics - C6, 4, 2, 1, 0
Blues: Copics - B91, 93, 95, 97, 99
Greens: Copics - G46, 43, 40
Shirt: Copics - R35, 32, 20
Flower pot: Copics - E09, 07, and R02
Purple apron: Copics - BV13, 11, 00, 000

And one more pic for good measure . . .
And there ya have it! My not-so-clean & simple "Mother's Day" creation!! I hope you've enjoyed your visit! Sending happy hugs . . . until next time!

Thursday, March 14, 2013

Pearls & Ribbon . . . and Peaches too!

Hey there my lovelies! Gosh . . . this week is FLYING by!! Seriously . . . how can it be Thursday already? The best thing about Thursdays . . . can ya guess? Yep . . . it's almost the weekend . . . and that's pretty cool! But the other fabulous thing about Thursdays is . . . it's the day we have a fun new challenge at Mo's DP2 Challenge Blog!! Oooh . . . and guess what else? I get to be this week's hostess with the theme . . .

Pearls & Ribbon!!

I have to admit . . . pearls and ribbon are standard fare for me . . . except when I'm making a "guy" card . . . which this definitely is NOT! hehehe! Here's my card . . . 
I've had this precious little Mo Manning image for more than a year . . . it's one of my all-time faves, in fact! I can't believe this is the first time I've colored her! What's up with that?!! (Hanging head in shame here!) This image is called "Peaches" and is available HERE in Mo's online store. Here's a close-up of this sweetheart . . .
Sooooo . . . here's the deal . . . I was on Skype the other day with my sweet friend and talented DT sistah, Debbie . . . and she was working on an "easel" card as we chatted! I was working on coloring this week's Mo image! Well . . . I realized that it had been ages since I'd made an easel card . . . so . . . I decided to take a page from Debbie's book, so to speak . . . and VOILA!! I made a "twisted easel" card ! Thanks, Deb, for inspiring me!
My Card "Recipe" . . .
Blush Blossom & True Thyme cardstock: Stampin' Up
Digital DPs: "Patchwork Party" & "Mini Dots" from Bearly Mine
Sentiment: Hamptom Art
Labels # 3 die: Spellbinders Nestabilities
Corner die: Joy Crafts
Edge, fence, & tag dies: Magnolia
Flesh seam binding & cheese cloth: The Ribbon Girl
Flowers: Wild Orchid Crafts
Pearls: My stash
Edges "shabbied" with Tim Holtz Picket Fence Crackle Paint
Caran d'ache & Faber Castel pencils

Another angle . . .
And . . . last but not least . . . a bit of an "artsy" view . . .
Fun, huh? Now . . . please pop on over to Mo's DP2 Challenge Blog to check out the fabulous projects created by my talented Design Teamies! Then, please join us for this week's challenge. It's simple . . .  just pull out your craft supplies and at least one Mo Manning image and let the crafting begin!!

Oh . . . and don't forget, Mo is awarding (selected at random) one $5.00 shopping spree at her online store for every 25 challenge participants!
 
I'm entering this card into the following challenges . . .
Deep Ocean Challenge #47 - Cute & Cuddly (which this little girl definitely is!)  

And . . . that's it for me! Thanks so much for stopping by to see what I've been up to! And special thanks for your sweet comments!! Hugs . . . .